
How to Overclock Your PC
Posted on 11:33am, Wednesday 4th April, 2023
Overclocking your PC or Laptop can be an exhilarating experience that can bring significant performance benefits. By increasing the clock speed of your AMD or Intel processor and other hardware components, overclocking allows you to push beyond its factory-set limitations and achieve higher frame rates, faster processing speeds, and smoother overall performance. However, overclocking should be approached carefully if you're unfamiliar with its risks; overclocking should always be approached with caution if this process is unfamiliar to you.
Before discussing the specifics of overclocking, it's essential to understand its purpose and function. Overclocking involves increasing the clock speeds of your CPU, GPU, or other hardware components beyond their default values; this allows your computer to perform more operations per second for improved performance and faster processing speeds; overclocking may even lead to improved gaming performance with smoother and more stable frame rates due to increased clock speeds.
But overclocking comes with some risks. By increasing the clock speed of your hardware, overclocking may generate additional heat, which may cause stability issues or even damage if managed improperly. Overclocking also may void warranties, so it is crucial that all parties involved understand its possible ramifications before pursuing overclocking.
Now that we understand the fundamentals of overclocking let's go deeper. To start off the process of overclocking, identify which hardware components you wish to overclock (typically CPU, GPU, and RAM, as these have the most profound impact on overall system performance), then calculate their current clock speeds before overclocking them.
After downloading and installing an overclocking software program such as MSI Afterburner, Intel Extreme Tuning Utility, or AMD Overdrive, the next step should be downloading overclocking software to adjust clock speeds on hardware components. Once this step has been accomplished, you'll be able to adjust their clock speeds more effectively.
As with any endeavour, when it comes to overclocking, it's essential that one takes steps carefully and mindfully. Increase clock speeds of hardware components gradually until stability has been ensured; check temperature readings closely, as overclocking may produce additional heat that may damage components if left unmanaged.
What is overclocking?
If you want to know how to overclock your PC, first you need to understand what overclocking is, Overclocking can help computer enthusiasts and gamers to increase performance from their hardware. Overclocking refers to the practice of increasing the clock speeds of computer components such as the central processing unit (CPU), random access memory (RAM), and graphics processing unit (GPU) beyond their factory-set limits to improve performance. Overclocking also allows users to increase clock speeds beyond factory limits resulting in a faster computer.
The clock speeds of CPUs are measured in gigahertz (GHz) and represent their processing rate. By increasing its clock speed, an individual CPU can process instructions faster, leading to improved performance. Overclocking requires increasing voltage supplied to it, which produces increased heat production, which could create stability issues and shorten its lifespan significantly.
Overclocking RAM involves increasing its frequency, which in turn speeds up data transfer rates and can result in faster load times and improved system responsiveness.
Unfortunately, like CPU overclocking, overclocking RAM may cause instability issues or require voltage increases in order to achieve higher frequencies.
GPU overclocking involves increasing the clock speed and voltage of a graphics card to achieve faster frame rates and better graphics performance, but it can create stability issues and generate additional heat.
Overclocking comes with inherent risks and should only be undertaken by experienced users who fully comprehend its possible repercussions. Overclocking increases heat production, which, if mismanaged improperly, could damage components. To mitigate this risk effectively, users must ensure their cooling system can manage this extra heat generated from overclocked components.
Overclocking can be accomplished using several methods, including changing BIOS settings or using software utilities provided by component manufacturers or third-party applications. Users should remain mindful of potential risks when overclocking and take necessary precautions to protect components.
Overclocking is an advanced computer technique computer enthusiasts and gamers utilize to boost their hardware performance. Overclocking involves increasing clock speeds on components such as CPU, RAM, and GPU beyond their factory-set limits to significantly increase performance. Although overclocking may result in noticeable performance upgrades, it also comes with certain risks that users must manage properly to mitigate, including managing heat generated by components. Proper precautions are taken when overclocking can provide substantial gains that take gaming and other computer-intensive activities to a whole new level!
How to Overclock Your PC: A Step-by-Step Guide
Step 1: Determine your CPU's core temperature
The first step in overclocking your PC's CPU is to determine your CPU's core temperature. This is important because overclocking increases the amount of heat generated by your CPU, and if you push it too far, you can cause it to overheat and potentially damage it.
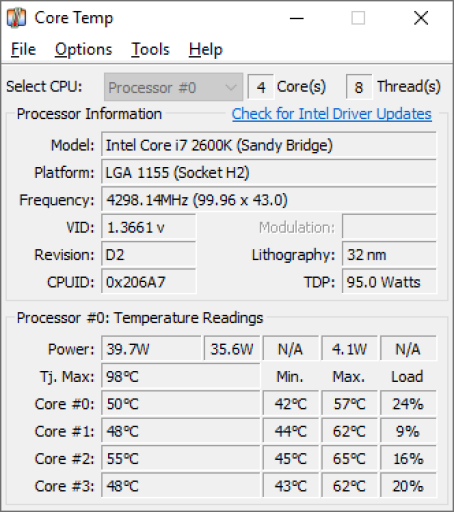
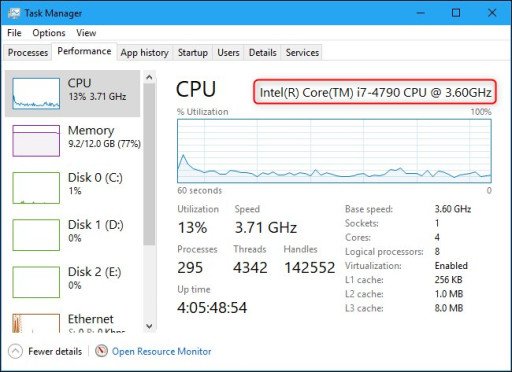
You'll need to download a temperature monitoring tool to determine your CPU's core temperature. Several free tools are available, including HWMonitor, Core Temp, and SpeedFan. These tools can give you real-time readings of your CPU's temperature, allowing you to monitor it as you overclock.
Once you've downloaded a temperature monitoring tool, open it up and take note of your CPU's current temperature. This will give you a baseline for how hot your CPU is running at its default clock speed. Ideally, you'll want to keep your CPU's temperature below 80 degrees Celsius (176 degrees Fahrenheit) to prevent overheating.
It's important to have adequate cooling when overclocking to prevent damage to your CPU. If your CPU is running hotter than 80 degrees Celsius, you may need to clean your computer's cooling system or upgrade your CPU cooler before proceeding with overclocking. When you're ready to proceed, return to this point for step 2.
Why Monitor Your CPU's Core Temperature?
Overclocking your PC can generate heat, which could damage its hardware. Monitoring your CPU core temperature to avoid overheating damage caused by overclocking is vitally essential to avoid such catastrophes. Overclocking may reduce its lifespan or cause it to fail altogether - so keeping track of its temperature within safe limits is of utmost importance for ensuring its longevity and safe usage.
What Are Safe CPU Temperatures?
Your CPU's ideal temperature range will depend on its model, make, and manufacturer; as a general guideline, though, aim for temperatures below 80degC; once temperatures surpass 90degC, you should immediately stop overclocking and return to default settings; some CPUs such as Intel, 's Core i9-10900K can tolerate sustained high temperatures up to 100degC without risk to its long-term health; however, these high temperatures mustn't cause long-term damage to its hardware.
How Can You Monitor the CPU Core Temperature?
Core Temp, HWMonitor, and SpeedFan are three software programs that can monitor your CPU's core temperature in real-time, offering real temperature readings and providing alerts if it exceeds safe temperature limits. A CPU cooler should also be installed - air or liquid options depend on budget and preference; air coolers typically offer cheaper installations, while liquid cooling units often deliver superior cooling performance but may take more work to set up correctly.
Consequences of Ignoring Your CPU's Core Temperature
Neglecting your CPU's core temperature while overclocking can have disastrous repercussions, including reduced performance and potential hardware component damage. Furthermore, sustained high temperatures can have long-term ramifications on its lifespan and risk of failure, potentially even leading to its catching fire as an extreme safety hazard.
Measuring your CPU core temperature is a key step in overclocking your PC. You can ensure maximum system performance while decreasing the risk of hardware damage by keeping it within safe limits and monitoring it with software programs such as Temperature Pro or Intel's SpeedStep application. Be sure to install a CPU cooler and pay attention to warnings or alerts indicating too high of temperatures on your processor - taking these measures will allow you to enjoy all the advantages of overclocking without endangering either hardware or your safety!
Step 2: Perform a system stress test

Perform a System Stress Test When Overclocking Your PC To overclock your PC is to run its CPU, GPU, or random access memory (RAM) at higher clock speeds than their rated frequencies, increasing performance but potentially unbalanced hardware and causing instability or damage. To ensure your system can handle its increased clock speeds safely, it is vital to conduct a System Stress Test;.
What Is a System Stress Test?
System stress testing is an effective method of gauging your computer's stability and performance under heavy loads. Your PC is subjected to intense levels of strain during this testing to simulate conditions it might experience during intensive workloads or gaming sessions; this stress test enables you to detect any weak points or vulnerabilities that could cause it to crash or become unstable during regular use, helping identify any weaknesses or potential threats to stability that might prevent regular usage from functioning smoothly.
Various stress testing software programs on the market, such as Prime95, AIDA64, and IntelBurnTest, provide essential PC stability tests such as Prime95, AIDA64, and IntelBurnTest. These programs place considerable strain on your CPU and RAM to mimic heavy usage scenarios, and some also provide GPU stress tests to test their stability. These tests may take several hours to complete but are essential to ensure an overclocked PC remains stable and functioning correctly.
How Can You Conduct a System Stress Test?
Stress testing a system involves several straightforward steps. First, select and download a stress testing software program compatible with your PC's hardware; many free programs online are available to meet this need. After installing and configuring this software to simulate stress on different components of your computer, the test process can commence.
Prior to undertaking any testing on your PC, it is imperative to monitor its temperature and voltage levels to ensure they remain within safe limits. Overclocking can cause additional heat generation that must be properly dissipated to protect its hardware; HWMonitor or Core Temp can help you do this.
Once you've installed stress testing software and monitored your PC's temperature and voltage levels, the test can commence. The software will impose heavy loads upon its components to simulate heavy usage scenarios; this may take several hours; during this time, you should not use your PC for other tasks - so that all aspects are working at full capacity during this test period.
After your PC undergoes its test, stress testing software will produce a report detailing whether it passed or failed the examination. If your PC passes, that means it's stable and can handle increased clock speeds; otherwise, any hardware issues must first be resolved before overclocking can safely begin.
Stress Testing of Systems Is Important
System stress testing is essential to overclocking, as it ensures your PC remains stable and works correctly at increased clock speeds. Without stress testing, your PC could become unstable and frequently crash - leading to data loss, hardware damage, and even loss.
Stress testing also serves to identify any weaknesses with your hardware that need to be addressed before overclocking, which may produce more heat than expected and cause permanent damage if not designed to handle such temperatures. Stress testing helps identify these weaknesses so you can address them before any irreparable harm is caused.
Stress testing can do more than ensure stability and identify issues; it can also help fine-tune your overclocking settings. Stress test results can help determine whether adjustments need to be made in terms of clock speeds, voltages, or any other factor for optimal performance and stability - although this process might involve trial and error before finding an ideal balance between performance and stability is reached.
Stress testing can also help you assess the overall performance of your PC. By pushing its components to their limits, stress testing provides an accurate picture of their capabilities and limitations, helping you make intelligent decisions when upgrading or replacing hardware in the future.
System stress testing is integral to overclocking your PC safely and achieving maximum performance without risking hardware damage. Before applying any overclocking settings, be sure to perform a system stress test to ensure stability, identify hardware issues, fine-tune settings, and evaluate overall performance. With the proper stress testing software and monitoring tools in place, safe overclocking can be achieved safely - thus leading to optimal performance without risking hardware failure or potential damage to components. So if you plan on overclocking your system, be sure to perform a system stress test prior to applying any overclocking settings - to make sure everything is stable and working as intended before applying any overclocking settings - as this will ensure it ensures stability in terms of system functionality and correct functioning.
Step 3: Check your CPU's performance
Overclocking your PC involves changing its hardware in order to run faster than its default speed settings, usually by increasing CPU clock speed and voltage settings. Overclocking can significantly enhance performance; however, its heat output increases and could damage or unstable your system.
What Are My Reasons for Checking CPU Performance?
Checking your CPU's performance requires conducting tests and benchmarks that measure its overall speed and stability, such as processing speed, memory bandwidth, and overall system performance. By conducting these tests, you can assess if your processor can support overclocking as well as ensure that it remains safe.
How to Assess CPU's Performance (Intro)
There are multiple methods available for testing the performance of your CPU, including:
CPU Stress Test: A CPU stress test simulates maximum load to assess its response to pressure, usually using special software designed to stress your processor with complex calculations and simulations. One such popular CPU stress testing tool is Prime95.
CPU Benchmark: CPU benchmarks measure your processor's performance by running standardized tests replicating real-world workloads, typically measuring its processing speed, memory bandwidth, and overall system performance. Examples of such bench marking tools are PassMark Performance Test and Geekbench.
Temperature Monitoring: Overclocking your CPU produces more heat than running it at its original settings, so it is vitally important that its temperature be carefully monitored during stress testing and benchmarking. You can use HWMonitor or Core Temp as tools to track this and ensure it remains within safe limits.
Why is Performance Evaluation Crucial for CPU?
Performance testing of your CPU is important for multiple reasons:
- Safety: Misusing CPU overclocking can cause instability and damage to your system if done improperly, so you can ensure your system remains safe and stable by reviewing its performance before overclocking.
- Stability: Overclocking your CPU can cause your system to crash or freeze if its processor cannot keep up with its increased workload. Monitoring its performance is key in ensuring your system stays stable even after overclocking.
- Performance: Overclocking your CPU can significantly enhance system performance. Monitoring its performance can determine how much of an overclock should be implemented to achieve desired increases in performance.
- Compatibility: Not all CPUs are suitable for overclocking; by carefully inspecting their performance, you can assess whether you can handle overclocking without encountering compatibility issues.
- Optimization: Assessing your CPU's performance can assist in optimizing your system settings to get optimal performance from it. By identifying bottlenecks in performance, you can alter its settings for optimal results.
Checking your CPU's performance is an integral component of overclocking your PC. Running stress tests and benchmarks enables you to ensure that it is stable and safe for overclocking, as well as determine its maximum overclocking potential and optimize system settings accordingly for optimum performance. So if you plan on overclocking, first, be sure to inspect its performance.
Step 4: Access your BIOS
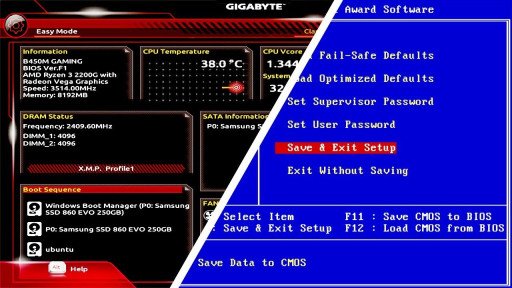
What Is BIOS?
BIOS, short for Basic Input/Output System, is an embedded firmware component on your motherboard that performs critical initialization and testing duties during boot-up and provides low-level communication between operating system components and hardware. Furthermore, BIOS also stores essential system configuration information including date/time settings as well as boot order.
How to Access Your BIOS
Accessing the BIOS can be a straightforward process, although the exact steps may differ depending on the make and model of your computer. Here are the general steps you can follow:
Reboot your computer. To do so, either click the Start menu and then Restart, or press and hold the power button and then the Options menu and Restart from there.
As soon as your computer begins booting up, watch for a message stating: "Press [key] to access Setup." This key may vary depending on your system; common ones include F2, F10, Del, and Esc.
Pressing a key as soon as you see a message may help prevent missed or incorrect key presses; otherwise, restart your computer for another attempt.
Once there, navigate using the arrow keys and enter the key. Your BIOS options and settings may differ depending on your motherboard and manufacturer.
Access Your BIOS Effectively
Accessing your BIOS is an integral step when overclocking a PC. You can fine-tune your system for maximum performance while mitigating any damage risks. Overclocking involves changing clock speed, voltage settings, and other settings on components that could potentially harm them; BIOS offers a secure way of making these adjustments with minimum risk to hardware.
As well as overclocking, BIOS access can also be beneficial for other tasks. You can use BIOS to change the boot order of drives, enable or disable specific hardware components and configure your system's power management settings.
Tips for Navigating the BIOS (BIOS) of Your System
Although accessing your BIOS may be straightforward, here are a few tricks and tips that may make the experience simpler and more effective:
If you need help accessing the BIOS on your computer, consult its manual or the manufacturer's website for instructions tailored specifically for it. They should provide clear steps on how to get into your BIOS.
Be wary: BIOS can be a potent tool that could cause irreparable harm if misused improperly. Ensure you read and fully comprehend any warnings or instructions before changing BIOS settings.
Before making changes to your BIOS settings, make sure you take detailed notes of their current state so that if anything goes amiss, you can quickly revert back to them if something goes awry.
Research: Before making changes to overclocking or BIOS settings, conducting some preliminary research is a good idea. There are plenty of online resources and forums dedicated to overclocking or BIOS settings modification; take advantage of them in order to gain more knowledge.
Accessing your BIOS is integral if you wish to overclock or make other hardware adjustments on your PC. BIOS serves as a low-level interface between the operating system and hardware components and allows you to make changes that could improve system performance. But beware, BIOS can be dangerous if misused - always read any warnings or instructions carefully before making changes! But used responsibly, BIOS access can become an invaluable asset for optimizing PC performance.
Step 5: Choose between automatic and manual overclocking
Overclocking should be approached carefully; otherwise, it can potentially damage components. An important decision when overclocking is whether to use automatic or manual overclocking methods; we will explore these differences as well as provide factors to keep in mind when making this choice.
Automatic Overclocking
Automatic overclocking, as its name implies, is a method of overclocking carried out automatically by the software. This involves pre-programmed settings that adjust your CPU, GPU, or RAM settings for faster speeds based on software analysis of your system hardware components to determine an optimum overclocking speed.
Automatic overclocking is a convenient and straightforward method of overclocking a PC without needing to manually adjust settings. Just a few clicks are all it takes for automatic overclocking to work its magic; therefore it makes an ideal option for beginners or those lacking technical know-how who need more technological know-how or experience to manually overclock their system themselves.
Automatic overclocking does have some drawbacks. Software may not always select the optimal overclocking settings for your specific system, and this could result in instability, crashes, and potential hardware damage. Furthermore, automatic overclocking may offer a lower level of performance than manual overclocking as software may not fully leverage your hardware's potential.
Manual Overclocking
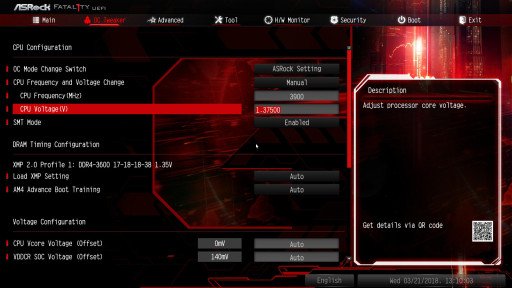
Manual overclocking entails manually tweaking your system's hardware settings - usually through your BIOS - for optimal performance. It requires technical expertise and knowledge of your hardware's capabilities to tune settings effectively for maximum overclocking results.
Manual overclocking gives you greater control and precision in overclocking your system, potentially leading to greater performance gains than with automated methods.
Furthermore, manual overclocking enables you to tailor settings based on your individual system rather than pre-programmed options.
Manual overclocking can be more time and labour-intensive than automatic. It requires technical expertise, experience, and the willingness to experiment with settings until finding your optimal overclocking speed is found. Furthermore, improper manual overclocking could damage the hardware.
Factors to Consider
When making a choice between automatic and manual overclocking, several key considerations must be kept in mind. These include:
Technical Knowledge and Experience
Manual overclocking requires technical knowledge and experience for optimal performance. If you are unfamiliar with your system's hardware or how to adjust settings for maximum performance, automatic overclocking may be a better solution; otherwise, if you prefer greater control over your overclocking efforts, manually may be the superior choice.
System Stability
Stability is of utmost importance when it comes to overclocking, as any attempt at aggressive overclocking can lead to system crashes, freezes, and possible hardware damage. Automatic overclocking does not always provide optimal settings, as its pre-programmed settings may not suit your system. In contrast, manual overclocking allows you to tailor settings specifically to ensure optimal stability but may take more time and effort than an automated solution.
Overclocking for Performance Gains
Overclocking is generally performed to enhance system performance. Automatic overclocking does not typically provide as significant of gains as manual overclocking due to pre-programmed settings that might not fully utilize your hardware's potential; on the other hand, manual overclocking allows finer control and enables fine-tuning settings to optimize gains as much as possible; but requires more technical expertise and experience from its practitioners.
Time and Effort
Overclocking takes both time and effort. Automatic overclocking may be faster and simpler, yet may provide fewer performance gains compared to manual overclocking; manual overclocking involves manually adjusting settings to find the optimum overclocking speed, whereas automatic may be the better solution if your time or energy resources are limited.
Risk of Hardware Damage
Overclocking can damage your hardware if done incorrectly, especially automatic overclocking which does not offer the most stable settings and can increase risk. Manual overclocking requires more technical knowledge and experience but may provide more precise settings, which pose less of a risk than automatic. Therefore, overclockers must understand and take measures against possible hardware damage in order to safeguard their hardware. They must be aware of all associated risks with overclocking as well as take appropriate measures in order to avoid hardware damage.
Choosing between automatic and manual overclocking methods can be a key decision when it comes to overclocking your PC. Automatic overclocking may provide quick performance gains without as much technical know-how required of manual overclocking, while manual overclocking requires greater technical know-how but offers greater control and precision when overclocking your system.
Step 6: Adjust the CPU multiplier
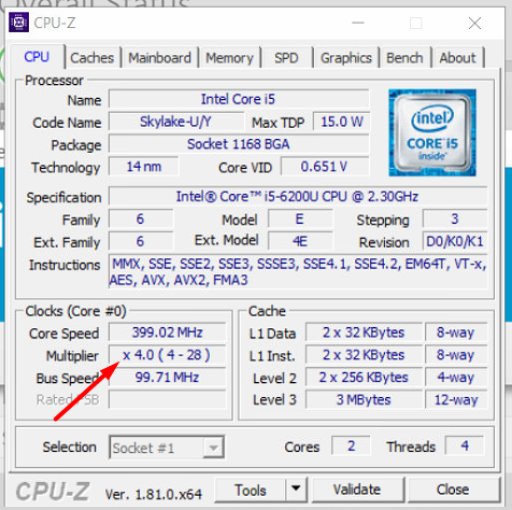
The CPU multiplier (or CPU ratio) is an adjustable setting that controls how quickly your processor operates. Multiplying its base clock frequency with your multiplier determines its final clock speed; for instance, if your base frequency is 100MHz and your multiplier of 40, your final clock speed will be 4GHz (100 x 40).
The CPU multiplier is an integral factor in determining your processor's performance. Raising its value will increase its clock speed, leading to increased PC performance; however, doing so increases heat generation, which could pose stability issues if not managed effectively.
How can I adjust the CPU multiplier?
Adjusting the CPU multiplier is a relatively straightforward process that can be accomplished within your computer's BIOS settings. Restart and press an appropriate key (usually F2 or Delete) to access them.
Once in BIOS settings, navigate to the CPU section. Here, you should find your multiplier setting listed as either "CPU ratio," "CPU multiplier," or similar terminology.
Adjusting the CPU multiplier requires only increasing or decreasing its value in your setting. Please keep in mind that increasing this setting will increase clock speed and heat generation from your processor, thus necessitating close monitoring to ensure it does not overheat.
Not all CPUs are created equal; certain models may be better at handling higher clock speeds even if they share the same base clock frequency and multiplier settings. Therefore, it is essential that you conduct thorough research before increasing the clock speed on your CPU by increasing its multiplier setting.
Why is the CPU multiplier important when overclocking my PC?
The CPU multiplier is essential when overclocking your PC as it directly influences its clock speed. By increasing it, your clock speed will increase along with the performance of your system.
However, increasing your CPU multiplier also raises heat production, potentially posing stability risks if mismanaged. Therefore, closely monitoring CPU temperature is vital to ensure it does not overheat and cause instability issues.
Adjusting the CPU multiplier can help you achieve higher overclocks - an act of increasing the clock speeds beyond their original factory specifications and leading to improved performance and faster processing times. Higher overclocks can result in improved performance and faster processing times for your PC.
Before making any adjustments to the CPU multiplier, it is important to be mindful that overclocking may void your warranty and cause irreparable damage if done improperly. It is wise to conduct extensive research prior to overclocking your PC.
Adjusting the CPU multiplier requires caution as overclocking may void its warranty and cause irreparable damage if done incorrectly. Therefore, before overclocking your PC, you must conduct ample research and be comfortable with its process.
As well as changing the CPU multiplier, overclocking your PC requires taking into account other aspects such as voltage, cooling system, and memory speed. To ensure its success and ensure proper management of each factor.
Adjusting the CPU multiplier is integral to overclocking your PC and can result in improved performance and faster processing speeds. To avoid any mishaps when overclocking your computer, proceed carefully by understanding all aspects of its overclocking process - such as the temperature management of your CPU. By considering all potential factors affecting performance, you can achieve higher overclocks that make the most out of all its components.
What happens if I get a black screen when I overclock?
Overclocking can also lead to instability and even damage to your components if not done properly. One of the more frequent issues associated with overclocking is black screen issues; we will discuss what causes black screens during overclocking and ways to prevent future incidents.
What Causes Black Screen During Overclocking?
Overclocking involves pushing your PC hardware past manufacturer-recommended specifications, often leading to better performance but sometimes also instability and overheating issues. One common overclocking result can be instability or system crashes when too much pressure is put on individual components that cannot cope with increased workload demands; overclocking thus can sometimes result in black screens when overclocked PCs reach dangerous temperatures for extended periods.
Another potential cause of black screen issues during overclocking could be your graphics card overheating. Graphics cards are sensitive to heat, and when they become overheated can even shut down to prevent damage. If your card does not receive adequate cooling, it may struggle to handle its increased workload due to overclocking.
What happens if I experience a black screen during overclocking?
A black screen indicates that your system has become unstable and crashed, forcing your computer to shut down to protect its components from further damage temporarily. Depending on its severity, you may need to restart it manually or wait for it to reboot on its own.
Repetitive system crashes can damage components over time, and overheating may cause them to degrade and malfunction, leading to lower performance or even total system failure.
How Can You Avoid Black Screen During Overclocking?
To avoid a black screen when overclocking, be extra vigilant and careful when making hardware adjustments. Do your research beforehand on what capabilities and limitations exist within your hardware system before initiating overclocking; overclocking too aggressively could cause instability and crashes, so ensure your system's stability after each adjustment made.
It is crucial when overclocking to ensure that your system is adequately cooled. By investing in quality cooling solutions such as liquid cooling or high-end air cooling, liquid can help avoid overheating and reduce crashes or black screens.
Overclocking your PC can effectively boost its performance, but proper implementation can cause instability and damage if done correctly. Overclocking too hard may result in black screens due to strain placed on components; by being cautious when overclocking and investing in proper cooling solutions, you can help avoid them and ensure your system remains stable and reliable.
What is overclocking a CPU?
Overclocking a CPU refers to increasing its clock speed beyond its factory-set or rated speed to attain higher performance levels and thus speedier processing times and improved system performance. Overclocking is most often employed by computer enthusiasts, gamers, and professionals seeking increased power and speed from their systems.
Why Overclock a CPU? Overclocking can significantly improve system performance by enabling the CPU to process instructions more rapidly, which can prove especially advantageous for gamers who require faster processing speeds for improved gameplay performance. Overclocking also offers increased processing power that professionals working in computationally intensive applications like video editing, rendering, and scientific simulation can leverage.
Overclocking a CPU does not come without its risks, however. Overclocking could increase temperatures to unsafe levels and cause instability or damage over time. Furthermore, overclocking voids the warranty of your CPU or computer system, which could mean costly repairs or replacements should something go wrong.
How to Overclock a CPU
Overclocking involves altering the clock speed beyond its rated speed as set by its manufacturer through either BIOS settings or software tools designed specifically for overclocking. Adjustments made can include increasing or decreasing CPU multiplier frequencies or base clock frequencies to achieve faster clock speeds and improved performance.
However, overclocking a CPU should only be undertaken with extreme caution by those with extensive computer hardware and software knowledge. Improper overclocking may cause unstable system performance, crashes, and hardware damage if done incorrectly; to protect against this risk, it is also vital that the temperatures of your CPU remain under control to prevent overheating, which could potentially harm the system.
Overclocking a CPU can be an effective way to enhance system performance, but it comes with risks. Therefore, overclocking must only be attempted by individuals familiar with both computer hardware and software. Furthermore, temperatures and system stability must be closely monitored during overclocking to ensure no damage occurs to your system. Overclocking can yield significant performance gains when done correctly - though not recommended for novice computer users.
What does overclocking do, exactly?
Overclocking a CPU is an increasingly popular practice among tech enthusiasts and gamers to extend their computer's performance beyond what its manufacturer intended. This involves increasing its clock speed (the number of instructions executed per second by its processor).
By overclocking their CPUs, users can achieve greater processing power, faster data transfer rates, and improved system performance - ultimately improving user experiences with activities that require heavy processing loads, such as gaming or video editing.
Overclocking may lead to detrimental results on a computer system, including higher temperatures, instability, and potential hardware damage. Furthermore, overclocking could void its warranty and render any warranty voided null and void.
Be mindful that not all CPUs can overclock; even if one can, its level of performance improvement may differ depending on its hardware and cooling system.
Overclocking can be an effective means of increasing system performance but requires careful thought and an awareness of any associated risks.
Frequently Asked Questions
Is overclocking safe?
Overclocking may come with certain drawbacks. Overclocking causes the CPU to produce additional heat, potentially damaging components in your computer and potentially leading to instability issues and crashes or system errors.
Overclocking depends on a number of variables, including CPU quality, cooling system efficiency, and the experience and knowledge of those performing it. To ensure safety during overclocking, only experienced users should attempt overclocking their CPUs carefully and cautiously.
How to overclock PC for FPS?
Overclocking your PC can increase FPS (frames per second) when playing games, though doing it improperly could damage the hardware. To overclock for FPS, you will need to adjust CPU and GPU clock speeds, voltage, and memory timings using software like MSI Afterburner; during the process, it's also essential that temperatures and stability of your system are kept under constant review to prevent overheating or crashes from taking place.
How to safely overclock your GPU?
To safely overclock your GPU, use software such as MSI Afterburner or EVGA Precision X to adjust clock speed, voltage, and memory timings gradually while monitoring temperatures and stability with benchmarking software. It is essential that you stay within any recommended limits or maintain proper cooling for your system while overclocking; have a backup plan such as creating system restore points or backing up important files in case anything goes awry.